Mariah Wells

Tuesday, April 2, 2019

EASTER 2019: BABY'S FIRST EASTER BASKET


one // two // three // four // five // six // seven

One of the things that I was most excited about in becoming a momma was getting to celebrate holidays and create our own family traditions. I know it will be so much fun to get to experience the magic of holidays through his eyes, and I cannot wait for it! Even though Liam is too young to be aware, I still wanted to celebrate his first holiday, so I'm putting together in an Easter basket for him. 

I wanted the items to be practical, but still cute and loosely Easter-themed. Most of the items we can use right now, but the wooden egg timer is for when he's a bit older. I think it will be perfect for timing activities like brushing teeth and sharing toys!

xx Mariah


Saturday, March 31, 2018

EASTER FAVORITES


With Easter right around the corner, I thought I'd share some of my favorite Easter decor!


1/2/3/4/5

 Here's a picture of the latte bowls on my kitchen shelves!
-xoxo
Thursday, November 16, 2017

HOLIDAY MANTEL


Sooo…I have a confession to make...I put my Christmas decorations up before Thanksgiving every year.🙈 
What can I say?! I LOVE Christmas so I want to enjoy the season as long as possible. To me, there's nothing better than a cozy house with a christmas tree (or three), twinkling lights, and the stockings lined up on the fireplace. 

Last week, I got Anthropologie's winter catalog and fell in love with these Christmas decorations! I love the eclectic mix of Christmas decor with everyday decor. I immediately knew I wanted to use this as my inspiration for my own decorations this year.
Design Elements
Mercury Glass
Fur Stockings
Seashell
White Textured Pottery
Whimsical Figurines


I kept these elements in mind when I was picking out my own decorations at Hobby Lobby, Nordstrom Rack, and my local antique store


Who else decorates before Thanksgiving?? 🙋

Sources
 Stockings: Hobby Lobby, 3 Tone Bottle Brush Trees: Nordstrom Rack, Mercury Glass Tree: Hobby Lobby, White Pinecone Votive: Hobby Lobby
Saturday, September 16, 2017

FALL GARLAND


I am so ready for fall this year! Unfortunately, it's still almost 90 degrees here in Chesapeake, but I'm not letting it stop me from day dreaming about pumpkin spice candles, chilly nights, bonfires, and Harry Potter Marathons. Okay, let's be real, I watch Harry Potter weekend every time it's on TV, but I always associate it with this time of year!

It's still a little early to break out the Halloween decorations, but I wanted to put out a couple of simple fall decorations until then. 

This diy fall garland is incredibly easy and free!

All you need is some leaves from your yard...
 And a needle and thread! 
I laid out all of the leaves I collected in my yard and tried to make sure I didn't have two of the same shapes or colors next to each other and threaded the string through all of the leaves. I threaded mine through the stem of the leaves, but it will still look cute if you thread it through the leaf itself.


And that's it! Super easy and it took me about 10 minutes to make. If I make this again in the future I might spray paint the leaves, or brush the edges with gold, but I wanted to stick with a natural look this time. 

This little burgundy, velvet pumpkin is from Michael's.

 Happy Fall! 🍂


Thursday, June 29, 2017

READING NOOK


Okay, so I might be biased, but these are the most beautiful chairs ever. I was doing the usual, watching Netflix and browsing through Craigslist, when I saw a listing that said Restoration Hardware chairs. My first thought was, "I bet they're still ridiculously expensive". Nope, they were $100 apiece. That might not seem like a bargain for Craigslist, but after looking up the price of brand new chairs from Restoration Hardware I was on the phone with the seller within seconds begging asking if he would sell me the chairs the following day. He told me that someone else was interested in the chairs, but maybe he heard the desperation in my voice because I ended up buying the chairs from him the next day. 🙈


These chairs are SO comfortable. I'm in love😍


 The pillow covers are from Hobby Lobby and the lamp is from Target. 


We weren't really sure what to do with this space originally because it's part of our living room but separate from the area with the couch and TV. I think it's the perfect place to sit and read now!


Dane is pretty proud of his longhorns that he bought when we were living in San Antonio so he insisted they have a place of honor in our living room haha


I made the table from a planter barrel from Home Depot and a piece of glass from Bed Bath and Beyond. 


I got this wooden vise at an antique store and thought it would be cute for my reading nook!

So, moral of the story, you never know when you're going to get lucky and find a treasure on Craigslist! 


Thursday, May 11, 2017

DIY: INDUSTRIAL CEILING FAN


 I love unique light fixtures, but most of them are ridiculously expensive! We bought a few new light fixtures for our home, but when it came to the ceiling fans I wanted to try to update them myself. All it took was some paint and changing out the lightbulbs! This is a super easy tutorial that can make a big impact when trying to update a home on a budget.

Living Room Before:


This is the fan that was in the living room when we moved in. I could've updated this fan and it would've looked fine, but I decided to swap it out for an extra fan that we had because I wanted all of the bulbs to point downward rather than to the side. Other than that, the fans were very similar.


I started by putting painter's tape on the exposed wiring and sockets, and spray painting the fan with an oil-rubbed bronze color.
I waited for it to dry and then applied another coat or two.


Once it was dry, I flipped it over and repeated on the other side.


The last step was to switch out the lightbulbs for Edison bulbs which really gives it an industrial feel. They don't give off quite as much light as some other bulbs, but since they're exposed and not covered by the glass bowl I don't notice much of a difference. 


Oh wait, I forgot the last step is actually to hold the fan above your head for an hour while your significant other tries to figure out the wiring. Then as the fan starts to feel heavier and your arms are shaking like limp noodles, rest the ceiling fan on the top of your head while you contemplate why you ever started this project in the first place, if you will ever have a living room light again, and if you'll need couple's therapy following the installation. OR, you could leave it to the professionals.
 Just a suggestion😁

Living Room After:


 Bedroom Before:


I forgot to take a picture until I'd already taken the bowl off. I get ahead of myself sometimes. Speaking of getting ahead of myself...Can you see where I painted the entire room except behind the headboard when Dane was out of town? Didn't think that one through.🙈

It's hard to tell from the picture, but the fan was originally brown with gold brushed on the base. 

Bedroom After:


I didn't get any pictures of the progress, but I did this one a little bit differently from the first. I didn't want to deal with the hassle of taking the fan down, so I taped off the ceiling around the fan and painted it by hand. (I covered the bed with a tarp first to catch drips). I used a black glossy paint for this one. It was a bit harder to find Edison bulbs for this fan because the bulbs needed to be much smaller, but I ended up finding some at Lowe's. 


Whether you spray paint or use a brush, it's a pretty easy project! (Minus the wiring debacle-haha) I'd say if your fan isn't installed yet then spray painting is the easier, faster route. If you decide to paint it by hand then expect to see some brush strokes. We almost always have our fans on so we never notice any imperfections!

I hope this gives you some inspiration for updating your own ceiling fans!


Saturday, April 22, 2017

FIREPLACE UPDATE


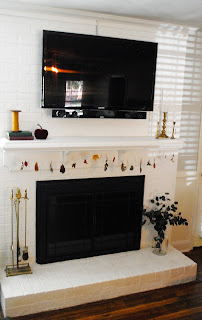
One of the biggest transformations in the house so far has been the fireplace. Don't get me wrong, I love traditional red brick fireplaces, but in this house I felt like the color made the room feel darker and more dated. I knew that painting the fireplace white would brighten up the room and give a good contrast to the dark floors. Dane usually trusts me when it comes to design and decorating, but I really had to talk him into this one! I was so relieved that he ended up loving the final result because it was a bit of a gamble!


We prepped the fireplace by using a wire bristle brush to gently dislodge any loose bits and vacuumed them up. We also taped some plastic over the doors so we wouldn't have to worry about getting paint on them.


Okay, I know it looks like she's doing all the work, but I was just taking a break to take pictures! Thanks Mom! 😘


In this picture, you can see that there was a small gap between the fireplace and the wood trim on the sides and top. After we were done painting, Dane used a line of white caulk to carefully fill in that gap which made it look much more seamless.


Once we had our TV and sound bar hooked up I painted the cords and cables so they would blend into the fireplace. 


All of the decorative items on the fireplace are from local antique stores except for the glass jug. I was looking for a glass jug for awhile, but all of the ones I was finding were $25 and up which I just couldn't justify. I ended up finding this one for $5 from an online brewing company of all places! The dried Silver Dollar Eucalyptus was also $5 at Hobby Lobby.